Sunday, February 13, 2011

Love Is In The Air... Kissing Heart 2 Heart Challenge

This week on the Heart 2 Heart challenge we are kissing! *BLUSH* Actually for those of you who are not familiar with the kissing technique Heart 2 Heart has put on a great video demonstration this technique and it's variation. You can also find demonstrations for this technique on the MyCTMH TV.


I decided to use the variation of second generation kissing first generation background. I used the stamp set D1353 Campin' Fever and the stamp set D1477 Universal Backgrounds for this part. I inked both the wood grain background and the wooden sign image in Chocolate Ink Z2111. I stamped the image on a piece of scrap paper once and kissed it with the inked wooden grain; I then stamped it on a piece of colonial white cardstock 1388. Here are some pictures of the image before and after been kissed with the wood grain.


I trimmed them out and inked the edges. I then stamped the image of the bear in the truck from the stamp set C1409 Beary Busy on a piece of Colonial White cardstock 1388, Tulip cardstock X5753, and Sweetheart B&T paper X7134B. I cut out portion of the truck from the B&T and the Tulip Cardstock and paper pieced it to the Colonial White Truck. I stamped the hearts from C1409 Beary Busy on Cotton Candy cardstock X5760, cut it out and coloured a few heart with the Tulip ink pad Z2166 using the Blending Pen 3174. I adhere the hearts with 3-D Foam Tape Z1151. I double matted my colonial white truck to cotton candy and tulip cardstock.


My base card is in tulip cardstock and the base mat is in Sweetheart B&T. I stamped the greeting Love You in Tulip Ink and the heart in Cotton Candy ink Z2193, and the heart stitching in Chocolate, from the stamp set C1441 Affection.


Well here is my entry for this weeks challenge. So much fun can't wait to see the next challenge.

Saturday, February 05, 2011

Happy Birthday and Challenge Combination

On Friday I was happily surprised by an e-mail informing me of having made top 10. Wow!! I was so excited but unfortunately I was at work and nobody there would understand just how cool that was. But luckily my friend and coworker Jen faked it for me. Hehehe

For the Heart 2 Heart Challenge this week was a layout.

I was having trouble finding time to complete this challenge, since I was picking up extra shifts at work to help cover for an other technician that left. Friday my best friend invited me to scrapbook with her and I did three for the price of one. 1. spent a great evening with my friend. 2. Made a gift for my amazing neighbour who turned 50 this week. 3. Completed the challenge.

I apologize for the quality of these pictures. Since I was not at home I took the pictures with my phone.

I got this template for a basket a while back and really wanted to use it.

I came across a blog which showcased these beautiful paper flowers. So I searched her blog through many past blog entries till I found her tutorial. I could show you haw to make these flowers, but I will not. Corina has already done it much better then I can.


I attached my flowers to the bottom of the basket with the only thing I could find so short notice. Wire. It is not the best but it works. Sort of.


I Then decorated the front of the box following the layout of the challenge. And voila. My gift is done.


More details: I used CTMH Craft Cardstock for the base of the card. The bulk Chocolate flowers buttons. My flowers are cut out of Basics 1 cartridge for the Making Memories Slice.

Tuesday, January 25, 2011

Time To Get Wild! : Heart 2 Heart Challenge

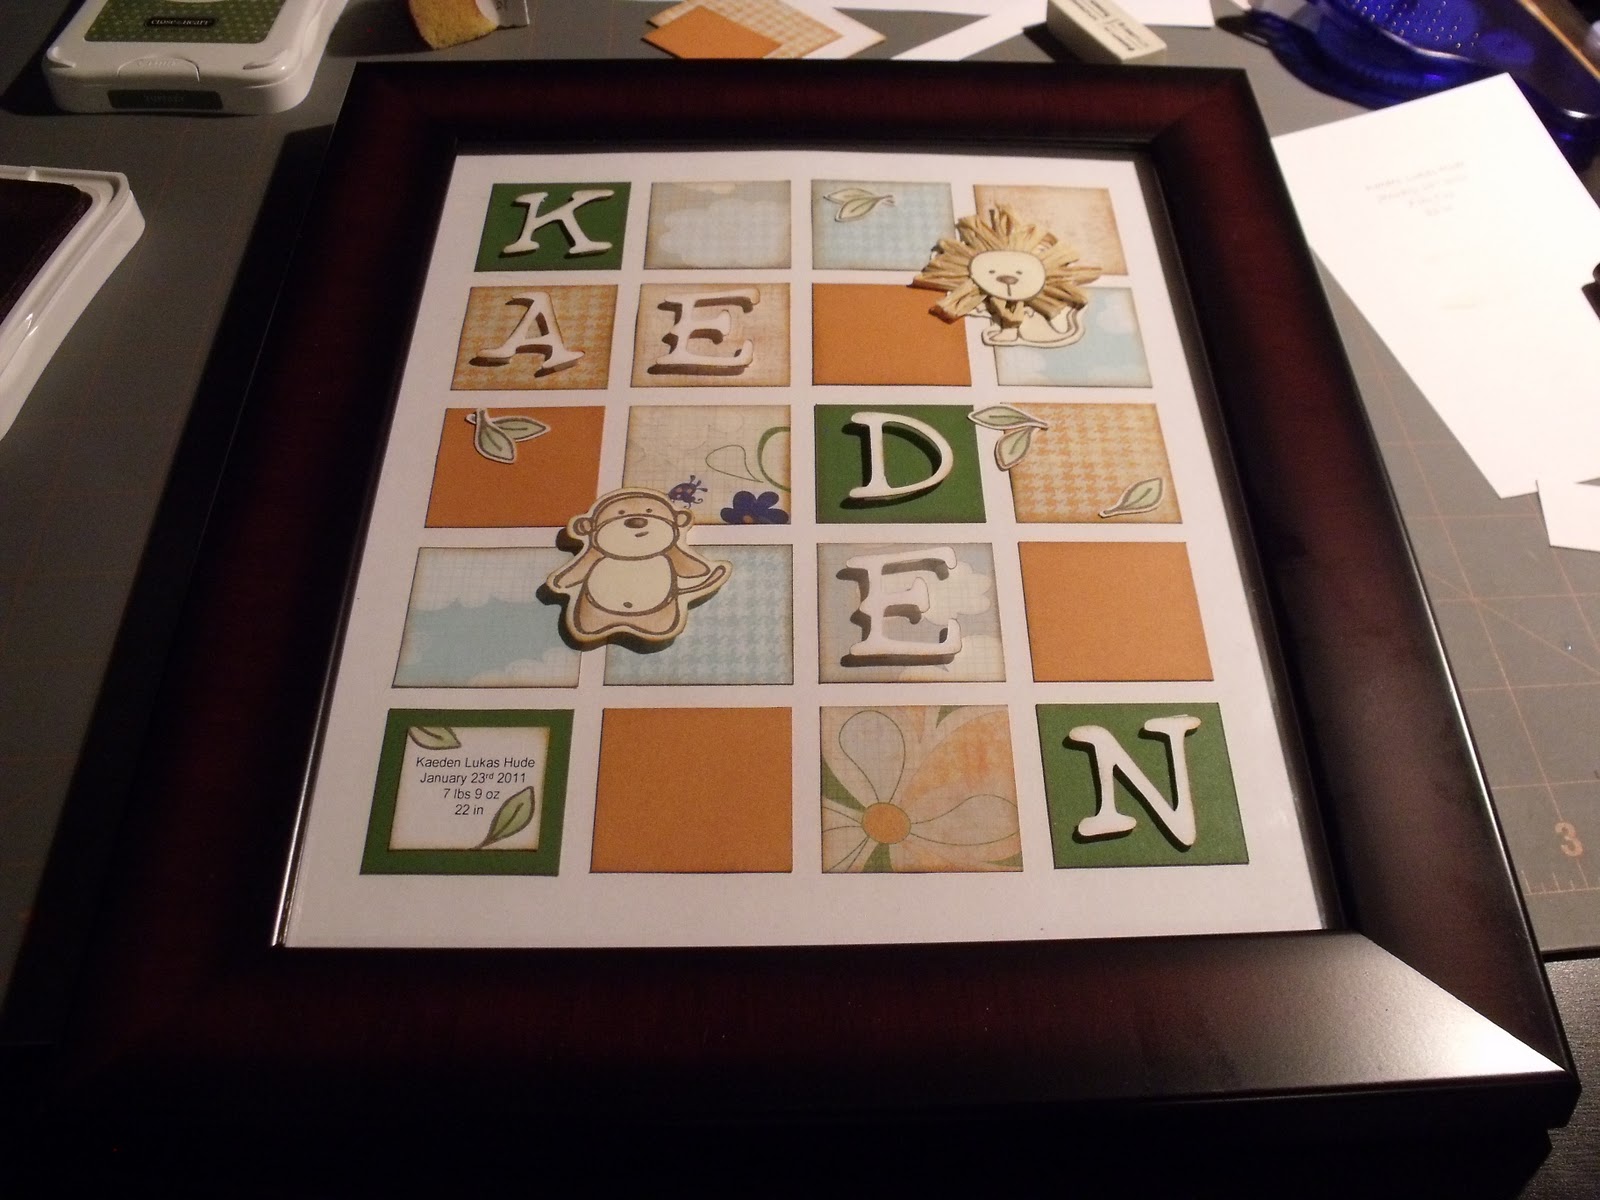
I have been blog hopping through the Heart 2 Heart blog and came across this great baby gift idea (I am sorry I can't remember who's blog it was). I saved the pictures to my computer since I knew this was a gift I wanted to make for my nephew, who at the time was not yet born. My sister Alysha was keeping the name of the baby a secret until the birth, so this gift had to wait until then. Well Kaeden Lukas Hude joined us on January 23 2011, and I am thrilled to go meet him. Hopefully tomorrow. So here are some pictures of his present.


I used the Level 2 Paper Kit: Splendor (X7124B), Life's A Jungle Stamp Set (D1285), Brown Bag Ink Pad (Z2108), Cocoa Ink Pad (Z2114), Parchment Ink Pad (Z2142), and Topiary Ink Pad (Z2155).


I have cut each square 1 1/2" x 1 1/2" and sponged the edges in Brown Bag.


I have stamped the lion in Cocoa and using the blending pen and the Parchment ink pad, I've coloured him in. I adhere the mane with glue dots, and then paper pieced his cute little head on.


I've coloured the monkey in Brown Bag and the mouth and tummy in Parchment. Oh and the nose in Cocoa.


The leaves are stamped in Cocoa, and coloured in Topiary.


The letters where cut out using Making Memories Paws & Claws cartridge for the Slice. I've sponged the edges in Brown Bag and adhere them with 3D foam.


I debated if I should use the glass on the frame or not. For durability and ease to clean, the glass is a plus. But with all the 3D elements... won't a glass squish them? I've decided to go with the glass. It is getting smooched  a little but the 3D effect is still there. And now my nephew's gift can last... and last... and last.


Saturday, January 22, 2011

Growing Love For Studio J

My love for cardstock and pattern paper runs deep. When Studio J was introduced I was unconvinced. I simply could not imagine enjoying the creative process with my beloved paper in hand. My mother who is not a scrapbooker had a reversed reaction. The creative process appealed to her more knowing there wouldn't be the intimidating mountain of tools and material involve.

Then I created my first four layouts on studio J in one evening (you can view these in my past blog), while watching TV. If you are familiar with the process of scrapbooking (which most of you reading this are) you know the time involve in creating a scrapbook page. Well worth the time!! But for all of those other pictures that I want to eventually get to scrapbook, Studio J as been the perfect solution.

Here are seven more layouts that I have completed more recently. The more I use Studio J, the more I like it and see it's possibilities.

Close To My Heart February promotion is Score A Perfect 10! If you're a Studio J member, you can take advantage of this great opportunity to fill up your scrapbook. For every 9 custom-printed Studio J layouts you buy, you’ll receive the 10th layout free. To receive the discount, just add 10 or more layouts to your cart. You’ll see a discount reflected in your order total. And you can totally take advantage of this promotion by ordering in multiples of 10. Buy 9, get 1 free. Buy 18, get 2 free. Buy 27, get 3 free. And so on! If you’re not a member yet, now’s a great time to join!


Tuesday, January 18, 2011

H2H From Your Heart To Ours Challenge

What are the chances?? I just finished posting about how I have my paper sorted. Please be sure to check out my previous post. Since I already did the paper. I decided that for this challenge I would show how the rest of my scrapbook material and tools are organized. **WARNING** I did not tidy for the pictures... and I'm a messy scrapper.

This is what would be on my left side when I am sitting down at the scrap table. I recently shifted everything over in my bedroom to give my scrapbook supplies a proper space. Big thanks to my husband for letting me take over our bedroom COMPLETLY.
 I bought the bookcase/desk at IKEA. It is perfect. Each cube section is 13.5" x 13.5". I know PERFECT size right!! and there are 25 cube sections. 5 high by 5 wide. There where smaller bookcase available but I'm glad i went with the big one. I already got it full.
This was my old paper system. I found these at walmart. 13 x 13.5 drawers. Perfect for paper. I have 4 stacked on top on each other here. Now they store random supplies
I have one drawer for my chipboard, one for embossing supply, 4 or 5 for stickers (which i don't use all that much but still buy), one for rub ons, etc...

 I have this bin full of project my kids have taken home, of pamphlet i have collected on a trip. Basically any thing I may want to add to my scrapbook when I get to working on that particular project.
 I got this bag at Regionals in Calgary. Its perfect. I can store the items i use the most close to my work surface so it near when i need it and i can pick it up and go for crops or workshops.
 My magazines and if you notice i have my ribbon in that dispenser bag. Love that.
 More magazines and my layout books... well some of them I can see i didn't unpack from the last workshop.
 These big box where the best for hiding my unfinished project and extra ribbons all sort of stuff like that.
 I keep the embossing powder i use often in the glad containers with a plastic spoon. So that I can pour it on my project and the excess powder falls right back in the container. Mess free! I have my adhesive in a drawer container on the side.
 Envelopes. I;m lucky to work at a pharmacy. Every so often they get rid of their envelope and I'm right there to collect. Not so much anymore.. I'm good in envelopes now.
 Stamps.. stamps and more stamps. I decided to use these Dollar store basket instead of the CTMH cases because i wanted easier access when I'm scrapping. I just have too many stamps for the cases.
 There containers holds my blocks, my punches and my sponges which i have cut into 6 and stapled a piece of paper indicating which colour it is for.
 And my Slice Elite. Love it.
 Well that was the grand tour. Can't wait to see your space.

Monday, January 17, 2011

Papers and Scrap

Well I have just completed card #3 and #4. Slowly getting them all completed, only ten more to go. For Card #3, I tried to use up the cardstock I had made for the H2H challenge. In fact this card is made completely with white cardstock. The half circle embellishment wasn't actually planed that way I just didn't have enough paper to complete a full circle.
The butterfly (from the January Stamp of the month) is inked in Sky Z2194, rock-n-rolled into Indian Corn Blue Z2130 and I Q-tipped some Pear Z2197 in the middle.
For card #4 I started with the ribbon rectangle. I've been blog hopping a lot lately and came across that idea and I decided to try it out.
I'm really pleased with the outcome. I stamped the flowers in Goldrush Z2123 and Crème Brulee Z217 with the stamp Rosy Regards B1369.
I place a piece of corkboard has my card background and stamped a border (from a now expired stamp set) in Cocoa Z2114.
These last two cards where done fully with my scraps. I'm pretty impressed with myself. Sometimes it seems that I have enough paper to scrapbook for a lifetime.
So I though I would share how I have my paper organized. This seems to work for me now. But there has been a lot of trial and error before I came to this set up. I have recently gotten a paper rack (which I LOVE!!!!) and i have it set up with my pattern paper on the top half separated into colours (mostly blues, mostly green, mostly black and browns, etc...) then the bottom half has my cardstock.... I have my CTMH cardstock together... and the rest is not yet really organized.
Then I have my CTMH paper packs in this carry case that my sister got me for my birthday a few years ago. Merci Jinny, Love ya.

And I have more CTMH cardstock in the CTMH 12 x 12 paper organizer z334 separated into each colour. I don't have all 60 colour represented here yet.

And then for my scrap paper. This is probably the set up that has been changing the most over the years. I don't throw scrap away very often... and I tend to keep fairly ridiculous small pieces. At first I had them in a box. Then I had tried a 12 x 12 filling folder box. But being that it is scraps all the paper would be at the bottom and it just didn't work all that great. Now I have them in these Stampin Up 12 x 12 Paper Holders and I have a resealable bag Z329 in each section for the little pieces.


This set up seems to work for me.... for now. I would be curious to know how you have your paper organized. Please leave me a comment and let me know.